Masking
Masking and Applying the Trim
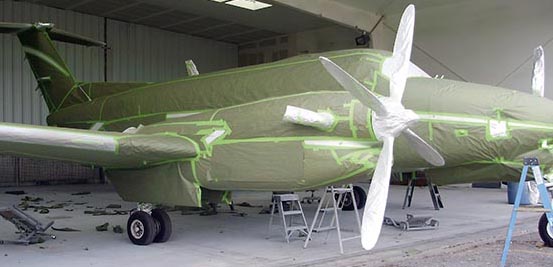
At this point in the project, the entire aircraft has been painted with the base color and all the masking paper and tape carefully removed. Refer again to the coating manufacturer’s technical data sheet for “dry and recoat” times for the appropriate temperatures and “dry to tape” time that must elapse before safe application and removal of tape on new paint without it lifting.
Masking Materials
When masking for the trim lines, use 3M® Fine Line tape. It is solvent proof, available in widths of 1/8–1 inch and, when applied properly, produces a sharp edge paint line. A good quality masking tape should be used with masking paper to cover all areas not being trimmed to ensure the paper does not lift and allow overspray on the basecoat. Do not use newspaper to mask the work as paint penetrates newspaper. Using actual masking paper is more efficient, especially if with a masking paper/tape dispenser as part of the finishing equipment.
Masking for the Trim
After the base color has dried and cured for the recommended time shown in the manufacturer’s technical data sheet, the next step is to mask for the trim. The trim design can be simple, with one or two color stripes running along the fuselage, or it can be an elaborate scheme covering the entire aircraft. Whichever is chosen, the basic masking steps are the same.
If unsure of a design, there are numerous websites that provide the information and software to do a professional job. If electing to design a personalized paint scheme, the proposed design should be portrayed on a silhouette drawing of the aircraft as close to scale as possible. It is much easier to change a drawing than to remask the aircraft.
Start by identifying a point on the aircraft from which to initiate the trim lines using the Fine Line tape. If the lines are straight and/or have large radius curves, use 3/4-inch or one-inch tape and keep it pulled tight. The wider tape is much easier to control when masking a straight line. Smaller radius curves may require 1/2-inch or even 1/4-inch tape. Try and use the widest tape that lays flat and allows for a smooth curve. Use a small roller (like those used for wallpaper seams) to go back over and roll the tape edges firmly onto the surface to ensure they are flat.
Finish masking the trim lines on one side of the aircraft, to include the fuselage, vertical fin and rudder, the engine nacelles and wing(s). Once complete, examine the lines. If adjustments are needed to the placement or design, now is the time to correct it. With one side of the aircraft complete, the entire design and placement can be transferred to the opposite side.
Different methods can be employed to transfer the placement of the trim lines from one side of the aircraft to the other.
One method is to trace the design on paper and then apply it to the other side, starting at the same point opposite the first starting point. Another method is to use the initial starting point and apply the trim tape using sheet metal or rivet lines as reference, along with measurements, to position the tape in the correct location.
When both sides are completed, a picture can be taken of each side and a comparison made to verify the tape lines on each side of the aircraft are identical.
With the Fine Line taping complete, some painters apply a sealing strip of 3/4-inch or 1-inch masking tape covering half and extending over the outside edge of the Fine Line tape. This provides a wider area to apply the masking paper and adds an additional seal to the Fine Line tape. Now, apply the masking paper using 1-inch tape, placing half the width of the tape on the paper and half on the masked trim tape.
Use only masking paper made for painting and a comparable quality masking tape. With all the trim masking complete, cover the rest of the exposed areas of the aircraft to prevent overspray from landing on the base color. Tape the edges of the covering material to ensure the spray does not drift under it.
Now, scuff-sand all the area of trim to be painted to remove the gloss of the base paint. The use of 320-grit for the main area and a fine mesh Scotch-Brite pad next to the tape line should be sufficient. Then, blow all the dust and grit off the aircraft, and wipe down the newly sanded trim area with a degreaser and a tack cloth. Press or roll down the trim tape edges one more time before painting.
There are some various methods used by painters to ensure that a sharp defined tape line is attained upon removal of the tape. The basic step is to first use the 3M Fine Line tape to mask the trim line. Some painters then spray a light coat of the base color or clear coat just prior to spraying the trim color. This will seal the tape edge line and ensure a clean sharp line when the tape is removed.
If multiple colors are used for the trim, cover the trim areas not to be sprayed with masking paper. When the first color is sprayed and dried, remove the masking paper from the next trim area to spray and cover the trim area that was first sprayed, taking care not to press the masking paper or tape into the freshly dried paint
With all the trim completed, the masking paper should be removed as soon as the last trimmed area is dry to the touch. Carefully remove the Fine Line trim edge tape by slowly pulling it back onto itself at a sharp angle. Remove all trim and masking tape from the base coat as soon as possible to preclude damage to the paint.
As referenced previously, use compatible paint components from the same manufacturer when painting trim over the base color. This reduces the possibility of an adverse reaction between the base coat and the trim colors.
Location and Placement of Marks
On fixed-wing aircraft, marks must be displayed on either the vertical tail surfaces or the sides of the fuselage. If displayed on the vertical tail surfaces, they shall be horizontal on both surfaces of a single vertical tail or on the outer surfaces of a multivertical tail. If displayed on the fuselage surfaces, then horizontally on both sides of the fuselage between the trailing edge of the wing and the leading edge of the horizontal stabilizer. Exceptions to the location and size requirement for certain aircraft can be found in 14 CFR part 45.
On rotorcraft, marks must be displayed horizontally on both surfaces of the cabin, fuselage, boom, or tail. On airships, balloons, powered parachutes, and weight-shift control aircraft, display marks as required by 14 CFR part 45.